Create or Reset an OPC account ssh key on Oracle Cloud (OCI)
If we forget to create an OPC account ssh key pair while creating a VM in Oracle Cloud or want to reset it or got deleted, how can it be done.It is a scary situation.
In this post I am going to share how to reset it.
Steps:
1) Login to Your OCI console
2) Go to Compute Instance and open the instance where the key has to be reset.

3) Scroll Down and Click Console Connection

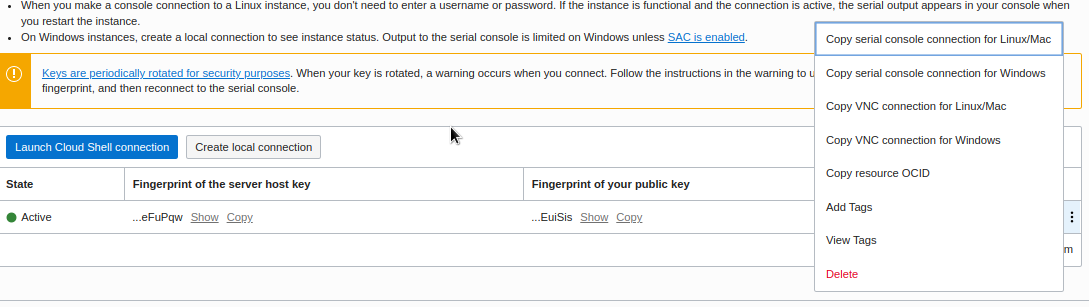
4) Click on Create local Connection
From a terminal run “cat ~/.ssh/id_rsa.pub” and copy it.
Click on Create Console Connection
Select the PASTE SSH KEYS option/ Or you can upload too
Paste the ssh public key into the field
Then click on Create Console Connection

After Creation it will be shown as below

Click on 3 dots on right and copy serial connection code. I will copy for linux as my desktop is linux.
Go to Desktop Terminal and paste it

5) Once the cloud connection is made it will ask for username and password. Keep the cloud shell terminal open and from VM click Reboot Button. We will see reboot process going on.


6) Monitor Shell and do as below
For instances running Oracle Linux 8.x or Oracle Linux Cloud Developer 8.x, follow these steps.
When the reboot process starts, immediately switch back to the terminal window and press Esc or F5 repeatedly until a menu appears.
In the menu that appears, select Boot Manager, and press Enter.
In the Boot Manager menu, select UEFI Oracle BlockVolume, and press Enter. Immediately press the up/down arrow key and continue pressing it until the boot menu appears. If Console messages start to appear in the window, the opportunity to access the boot menu passed, and you need to start the reboot process again.
For instances running Oracle Autonomous Linux 7.x or Oracle Linux 7.x, when the reboot process starts, switch back to the terminal window, and you see Console messages start to appear in the window. As soon as the GRUB boot menu appears, use the up/down arrow key to stop the automatic boot process, enabling you to use the boot menu.
In the boot menu, highlight the top item in the menu, and press e to edit the boot entry.
In edit mode, use the down arrow key to scroll down through the entries until you reach the line that starts with linuxefi for instances running Oracle Autonomous Linux 7.x, Oracle Linux 8.x, and Oracle Linux 7.x. For instances running Oracle Linux Cloud Developer 8.x, scroll down until you reach the line that starts with linux.
At the end of that line, add the following and press Cntrl +X
init=/bin/bash

Now we can see bash prompt from root user.

7) Now we will reset the OPC key on same terminal
a) Run Command "/usr/sbin/load_policy -i” - to preserve the SELinux policies for the files you will modify.
b) Run Command "/bin/mount -o remount,rw /“ - to remount the root partition with read/write permissions.
c) Run Command "cd ~opc/.ssh” - to change to the opc SSH key directory.
If you run a ls command you should see one file authorized_keys. If you run “cat authorized_keys” it may be empty or the wrong key; I can see it was empty.
d) Run Command “mv authorized_keys authorized_keys.orig” - as a safety precaution to back up the original file.
e) Run Command “vi authorized_keys” - to create a new authorized_keys file.
Press “i” to insert some text.
Paste in your ssh public key used from the previous step when you created the console connection.
Press ESC, enter “:wq”, and press Enter to write and quit the file to save it.
f) Run Command “chown opc:opc authorized_keys” to make sure the owner of the file is opc otherwise it will be owned by root.
g) Run Command “chmod 600 authorized_keys” to set the proper permissions.
h) Run Command "mount -o remount,ro /” to force the OS to flush the filesystem cache. It also guarantees that the filesystem is marked as "cleanly unmounted" when the machine comes back up from a reboot.
i) Run Command “/usr/sbin/reboot -f” to reboot the running instance.
Now let the server start using the default OS option.
j) After the instance has rebooted open a new terminal and try to ssh in using “ssh opc@publicip” Another alternative is to provide the location to your private key like “ssh -i ~/.ssh/my_private_key opc@myinstance”.
h) Now I can see my successfully login

8) We can now delete cloud console connection from OCI console.
Reference: https://docs.oracle.com/en-us/iaas/Content/Compute/References/serialconsole.htm#four__maintenancemode
Comments
Post a Comment